You would think learning how to screenshot on windows would be one clean little thing. Press a button, get a picture, move on with your life. But no. Windows has somehow managed to give people six different ways to do roughly the same job, and depending on your keyboard, your laptop brand, your settings, and whether your function key is behaving like a decent citizen, the whole thing can get annoying fast.
Still, once you get the hang of it, screenshots on Windows are easy. Mostly. There’s the old-school Print Screen key, the Windows shortcut that saves automatically, the Snipping Tool for when you only want part of the screen, and a few other methods that sit there quietly until you need them at 11:48 p.m. because your boss wants “a quick screenshot” and somehow that turns into ten messages and three red circles.
That’s why this guide exists. Not to sound grand about it. Just to make the whole thing less stupid.
Because most people don’t need a grand theory of screenshots. They need to know which keys to press, where the image goes, why nothing happened, and how to stop accidentally taking a shot of the whole monitor when all they wanted was one little error box that popped up like a raccoon in the kitchen and disappeared again.
So let’s get into it.
Start with the simplest one, the Print Screen key
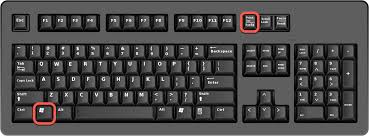
Look at your keyboard. Somewhere near the top-right area, usually around Insert, Delete, Home, and all those keys most people ignore until they hit them by mistake, you’ll see a key that says PrtSc, PrtScn, Print Scr, or some weird abbreviation that feels like it lost a fight. That’s your screenshot key.
Pressing Print Screen by itself copies your entire screen to the clipboard.
That means Windows captures what’s on the screen, but it doesn’t always save it as a file right away. It just holds it in memory. So after pressing it, you need to paste it somewhere. Open Paint, Word, an email, WhatsApp Web, Photoshop, whatever works, then press Ctrl + V. Your screenshot should appear.
This method is boring, old, reliable, and still useful. Especially if you don’t want Windows cluttering your folders with files you’ll never look at again.
That’s the first real answer to how to screenshot on windows. Press Print Screen, then paste.
Simple. A little primitive, but simple.
Want it saved automatically? Use Windows + Print Screen
Now we’re getting somewhere.
If you press Windows key + Print Screen, Windows captures the entire screen and saves it automatically as an image file. No pasting needed. No Paint detour. No “did it copy?” doubt.
Your screen may dim for a moment when it works. Not always dramatic, but enough to notice.
The screenshot usually gets saved in:
Pictures > Screenshots
That folder tends to be the default home for these images on most Windows systems. The files are often named something like Screenshot (1), Screenshot (2), and so on. Practical, if not exactly poetic.
For a lot of people, this is the best shortcut. Fast, clean, done.
Unless you’re on a laptop where Print Screen shares space with another key and now you’re doing keyboard yoga with Fn involved. We’ll get to that, because laptop keyboards are little chaos factories.
Just need one window, not the whole screen?
This one is underrated.
If you want to capture only the active window, say a browser tab, a settings box, File Explorer, or that one Excel sheet that has turned your soul gray, press:
Alt + Print Screen
That grabs only the currently selected window and copies it to the clipboard. Then, same deal as before, paste it somewhere with Ctrl + V.
This is useful because full-screen screenshots often include junk you don’t need. Open apps. Notifications. Background clutter. A random music player you forgot was open. Taking just the active window makes the screenshot cleaner, and frankly, less embarrassing.
So if someone asks how to screenshot on windows and they only want one app window, this is usually the shortcut worth memorizing.
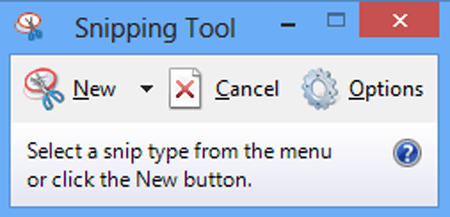
The best method for most people is Snipping Tool
Honestly, if you only remember one method from this whole article, make it this one:
Windows + Shift + S
That opens the built-in screen snipping tool. The screen fades a bit, a small toolbar appears, and you can choose what kind of screenshot you want to take. This is where Windows finally starts acting like it understands normal human behavior.
You usually get a few options:
Rectangular snip
Freeform snip
Window snip
Fullscreen snip
Most of the time, rectangular snip is the one you’ll use. You click and drag over the part of the screen you want, and Windows copies that snip to the clipboard.
Then a small notification usually appears. Click it, and the image opens in Snipping Tool, where you can crop, mark it up, save it, or stare at it for two seconds and wonder why you included the taskbar.
This method is flexible. Fast too. It’s what I’d recommend to almost anyone who wants control without installing anything extra.
There’s a reason people keep searching how to screenshot on windows even though the operating system already has the tools. The tools are there, sure, but Windows hides them behind shortcuts like it’s trying to make screenshots feel exclusive.
Snipping Tool itself is worth opening once
The Snipping Tool isn’t just a shortcut overlay. It’s also a regular app.
You can search for “Snipping Tool” in the Start menu and open it like any other app. Once inside, you can take a new snip, delay the capture by a few seconds, annotate the screenshot, save it properly, and work a little more calmly than you can with a rushed keyboard combo.
The delay feature is useful when you need to capture a menu or popup that disappears the moment you click elsewhere. You know the kind. Tiny settings menu. Hover menu. Right-click option list. Things that vanish like they owe money.
Set a delay, open the thing you need, let the screenshot happen.
This is one of those features people overlook for years, then discover and act like they found buried treasure under a plastic chair.
On some laptops, you’ll need the Fn key too
Here’s where Windows screenshot advice gets messy. Not because the software is so complicated, but because laptop manufacturers love turning basic shortcuts into small scavenger hunts.
On some laptops, pressing Print Screen alone won’t do anything because the key shares a function with something else, brightness control, volume, keyboard backlight, whatever. In that case, you may need to press:
Fn + Print Screen
or
Fn + Windows + Print Screen
or
Fn + Alt + Print Screen
It depends on the keyboard layout.
HP, Dell, Lenovo, Asus, Acer, all of them have their own little habits here. Some are sensible. Some feel like they were designed by a committee that had already given up.
So if you’re trying how to screenshot on windows and the normal shortcuts aren’t working, look for the Fn key near the bottom-left of the keyboard and try again with that added in. There’s a decent chance that’s the missing piece.
Xbox Game Bar can capture screens too, weirdly enough
This is one of those methods that feels unrelated until you need it.
Windows includes Xbox Game Bar, which is mainly for gaming features, recording, and overlays. But it can also take screenshots. Press:
Windows + G
This opens the Game Bar. From there, you can use the capture widget to take a screenshot, especially useful if you’re in a game or app where other methods are awkward.
There’s also a shortcut often used inside Game Bar setups:
Windows + Alt + Print Screen
That can capture the current game window directly.
This method won’t be your daily go-to unless you game a lot, but it’s good to know. Screenshots inside games can be oddly stubborn otherwise.

Where do screenshots go on Windows?
This trips people up more than it should.
If you use Print Screen or Alt + Print Screen, the image usually goes to the clipboard, not a folder. You have to paste it somewhere before it disappears.
If you use Windows + Print Screen, it usually gets saved automatically in:
Pictures > Screenshots
If you use Snipping Tool with Windows + Shift + S, it normally copies the screenshot to your clipboard first. From there, you can paste it anywhere, or click the notification to open and save it manually.
If you use Xbox Game Bar, screenshots are often saved in:
Videos > Captures
So when people say, “I took the screenshot but now it’s gone,” the answer is usually one of two things. Either it’s sitting in the clipboard waiting to be pasted, or it got saved to a folder they never check.
Windows does not always make this obvious. Which is classic Windows, really.
How to screenshot only part of the screen
This deserves its own section because it’s probably the most common real-world need.
Nobody wants to keep cropping giant screenshots when all they need is one paragraph, one image, one payment receipt, one error message, or one line from a conversation that somehow became evidence in a family argument about who said what.
The easiest way is:
Windows + Shift + S
Then drag to select the exact part of the screen you want.
That’s it. That’s the good method.
You can paste the captured part into Paint, Word, chat apps, presentations, or wherever else you need it. Or open it in Snipping Tool and save it as a PNG or JPG.
If your main reason for searching how to screenshot on windows is “I just want part of the screen and not all this extra nonsense,” this is the answer.
How to edit a screenshot after taking it
Most screenshots need a little cleanup. Maybe crop out the taskbar. Maybe hide personal info. Maybe circle the thing your coworker somehow missed despite it being right there in the center of the screen like a traffic cone.
You can do this with:
Snipping Tool
Paint
Photos app
Third-party tools if you want more control
Paint is still weirdly useful for simple edits. Open it, paste the screenshot, crop it, maybe scribble an arrow or box, then save it. Not elegant, but it works.
Snipping Tool is better now than it used to be. You can mark things up there too.
And yes, there are fancier apps. But for most people, built-in tools are enough unless your screenshots are part of your job and you need precision, blur effects, annotations, scrolling capture, or all the bells and whistles.
Why screenshots sometimes don’t work
Sometimes you hit the shortcut and nothing happens. Or at least nothing obvious happens. A few usual suspects:
The Print Screen key needs the Fn key
Clipboard history got in the way
The keyboard shortcut is disabled or remapped
A third-party screenshot app is intercepting the key
You pressed the right shortcut but expected a saved file instead of clipboard capture
That last one happens constantly.
You press Print Screen, then look in Downloads or Desktop, find nothing, and assume Windows betrayed you. It probably just copied the image to the clipboard. Open Paint and press Ctrl + V before declaring war.
Also, some laptops let you change function key behavior in BIOS or keyboard settings. So if your screenshot keys feel off, there may be a hardware-level setting involved. Annoying, yes. But fixable.
Best screenshot method for different situations
If you want the full screen saved instantly, use Windows + Print Screen.
If you want the full screen copied so you can paste it somewhere, use Print Screen.
If you want just one active window, use Alt + Print Screen.
If you want only part of the screen, use Windows + Shift + S.
If you want a delayed capture or a bit more control, open Snipping Tool.
If you’re inside a game, try Xbox Game Bar.
That’s the real map of it. You don’t need every method in your head. Just one or two that match how you work.

The funny thing is, the simplest method isn’t always the best one
Print Screen is the oldest answer to how to screenshot on windows, and for years it was basically the main one people knew. But now? I’d argue Snipping Tool is better for most normal humans doing normal human things.
Because screenshots are rarely about the whole screen anymore. They’re about specifics. A bug. A receipt. A section of a PDF. A product listing. A meme. A map. A conversation. That means partial capture matters more than brute-force full-screen shots.
And once you realize Windows + Shift + S exists, the older methods start feeling a little clunky. Useful sometimes, sure. But clunky.
Still, there’s one unresolved annoyance. Windows now has multiple screenshot tools layered on top of each other like old wallpaper. Print Screen. Snipping Tool. Game Bar. Clipboard behavior. Auto-save behavior. Some save, some don’t. Some notify, some don’t. You’d think by now this would all be one obvious system. It isn’t. Somehow it still feels like three departments built it and never fully compared notes.
That’s Windows for you.
FAQs
1. What is the easiest way to take a screenshot on Windows?
For most people, the easiest method is Windows + Shift + S. It lets you select exactly what you want on the screen instead of capturing everything. That saves time, and you won’t need to crop out random clutter later.
2. Where are screenshots saved on Windows?
If you press Windows + Print Screen, screenshots are usually saved in the Pictures > Screenshots folder. If you use Print Screen alone or Alt + Print Screen, the image usually goes to your clipboard and needs to be pasted first.
3. How do I screenshot only one window on Windows?
Use Alt + Print Screen. This captures only the active window instead of the entire screen. After that, paste it into Paint, Word, email, or any app that accepts images. It’s a neat shortcut and people forget it exists.
4. Why is my Print Screen key not working?
Usually because your laptop needs the Fn key too. Try Fn + Print Screen. Another possibility is that another app has taken over the shortcut, or you expected the screenshot to save automatically when it only copied to clipboard.
5. Can I take a partial screenshot on Windows?
Yes, and it’s probably the best built-in screenshot feature. Press Windows + Shift + S, then drag over the part of the screen you want. The selected area gets copied so you can paste or save it wherever needed.
6. Is Snipping Tool better than Print Screen?
For most everyday use, yes. Print Screen is fine for full-screen grabs, but Snipping Tool gives you more control. You can capture part of the screen, delay the shot, annotate it, and save it properly without extra steps.